Bar · Puzzle walkthrough
Bar Flag Briefcase and Chisel
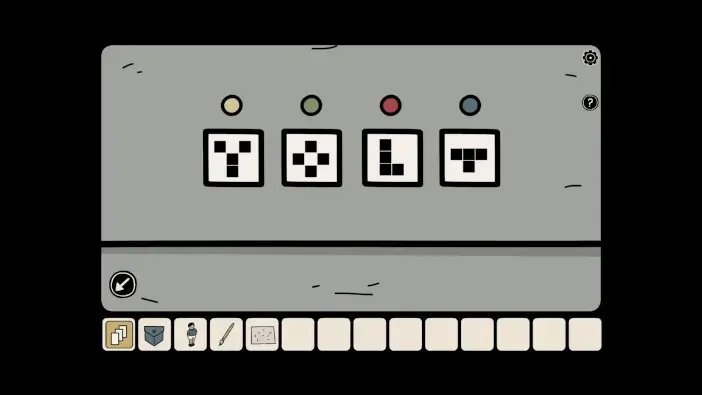
Quick answer
Set the Bar briefcase dials to the four icons shown in the answer image, in yellow → green → red → blue order. They come from plotting the matching stage-banner coordinates on the bar grid. Open the case for the chisel and electrical plug.
On this page
Before you begin
Before you begin
- Enter the Bar memory and reach the clown stage and main bar.
Follow the clues
- 01
Read the four banners
Inspect the four coloured banners behind the clown. Each gives letter-number cells; keep each colour’s cells together.
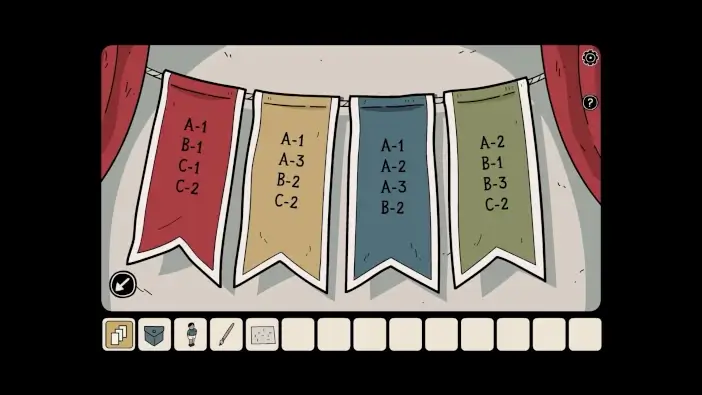
Read each banner separately; its colour determines the matching briefcase dial. Game image © Dark Dome; capture by Play Games Wiki. Compare source walkthrough ↗ You’ll know it worked: You have four sets of grid coordinates.
- 02
Turn coordinates into shapes
At the board left of the bar counter, mark the cells named on one banner. Repeat separately for the other three banners; each set outlines one shape. The board is a scratchpad and does not unlock the case itself.
You’ll know it worked: You can identify one shape for each banner colour.
- 03
Match the briefcase dials by colour
Inspect the briefcase in the bar. Set the four dials to the icons in the answer image: yellow, green, red, then blue from left to right. The banner colours explain which drawn shape belongs on each dial. Open the case and take both items.
You’ll know it worked: Take the chisel and electrical plug from the open briefcase.
If you’re still stuck
Why did marking the grid do nothing?
The grid only helps you visualize each banner’s shape. Enter the four resulting shapes on the briefcase, matching its dial colours.
Where do I use the chisel and plug?
Use the chisel on the stage owl’s eye. Attach the plug to the stage spotlight cable and connect it to the socket; the spotlight still needs a bulb.
Sources and scope
Based on public mobile walkthrough evidence checked September 23, 2026. Steam-version parity has not been verified. Checked 2026-09-23.