Laboratory · Puzzle walkthrough
Laboratory Cat Puzzle: Cabinet Code
Quick answer
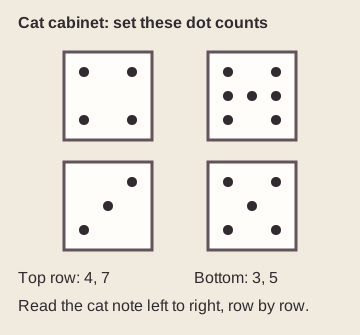
Set the cabinet’s four dot-count buttons to 4 and 7 on the top row, then 3 and 5 on the bottom. The note orders the cats: black-and-white, white, brown, ginger. Their clues are 4 filled vials, 7 lit candles, 3 leafy plants and a clock showing 5.
On this page
Before you begin / items and clue route
Before you begin
- Unlock the Laboratory memory and move through its rooms until you can enter the folders/office room.
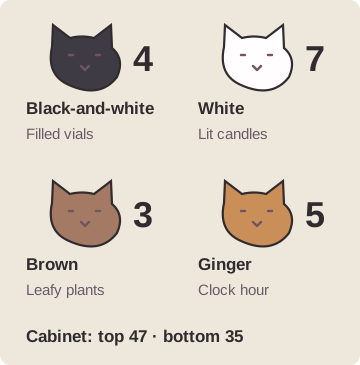
- Take the note about the cats from the folders on the table. It indicates the order of the four cats for the cabinet code.
Follow the clues
- 01
Record the order from the cat note
In the room with folders on the table, take the note showing the cats. Keep its pictured order in mind; the cabinet digits must follow that order rather than the order in which you happen to visit the rooms.
You’ll know it worked: You know the sequence in which to enter the four cat values.
- 02
Count the objects beside each cat
Visit the rooms with the cats and inspect the nearby objects: count 4 filled vials by the black-and-white cat; read 5 on the clock beside the orange/ginger cat; count 7 lit candles by the white cat; and count 3 leafy plants by the brown cat.
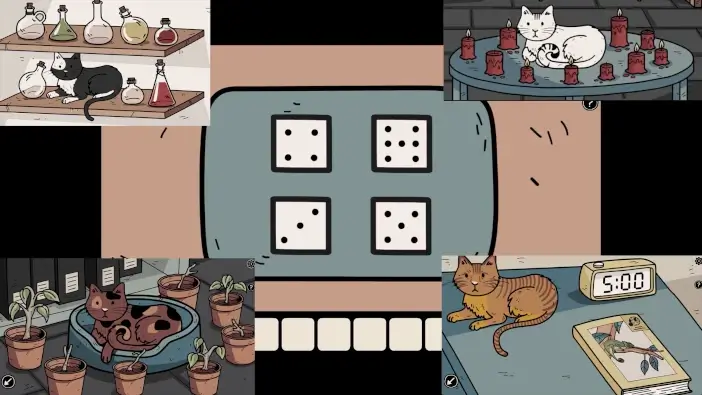
Compare the actual objects around each cat with the final four-button arrangement. Game image © Dark Dome; source capture by Play Games Wiki. View the source walkthrough ↗ You’ll know it worked: The four values are 4, 5, 7, and 3, assigned to their respective cats.
- 03
Enter the values in note order
Return to the cabinet in the white-cat room. Set its four dot-count controls to 4 at the top left, 7 at the top right, 3 at the bottom left and 5 at the bottom right. This follows the two rows of cats on the note.
You’ll know it worked: The cabinet opens; take the can and video camera.
- 04
Use the recorder and keep the sardines
Put the recorder on the tripod in the white-cat room. It still needs the night-vision lens from the fly chest and the room lights turned off. Keep the sardines for the crab: the can opener is inside the room behind the fingerprint door.
You’ll know it worked: The next camera task is prepared, and the fish is saved for the duck-radio sequence.
If you’re still stuck
I entered the four numbers in the order I found them and the cabinet stays locked.
Use the sequence printed on the cat note. The note controls the order; do not assume the physical room order is the code order.
What are the four cat clues?
The black-and-white cat is beside 4 filled vials; the orange/ginger cat has a clock showing 5; the white cat has 7 lit candles; and the brown cat has 3 leafy plants.
What is the final code?
Follow the order on the cat note. The completed entry is 47 across the top row and 35 across the bottom row.
Sources and scope
Mobile walkthrough evidence only; PC parity not checked. Checked 2026-09-23.